
If you have a special occasion coming up or simply want to wow a crowd with a dessert that’s as fun to make as it is to eat, you’ve landed in the right spot. The Best Poke Cake Recipe for Parties and Birthdays Recipe brings together a moist, fluffy cake with bursts of fruity gelatin and a cloud of creamy topping to create a colorful, crowd-pleasing centerpiece. It’s the perfect blend of texture and flavor that’s guaranteed to make your guests smile and keep them asking for seconds.
Ingredients You’ll Need
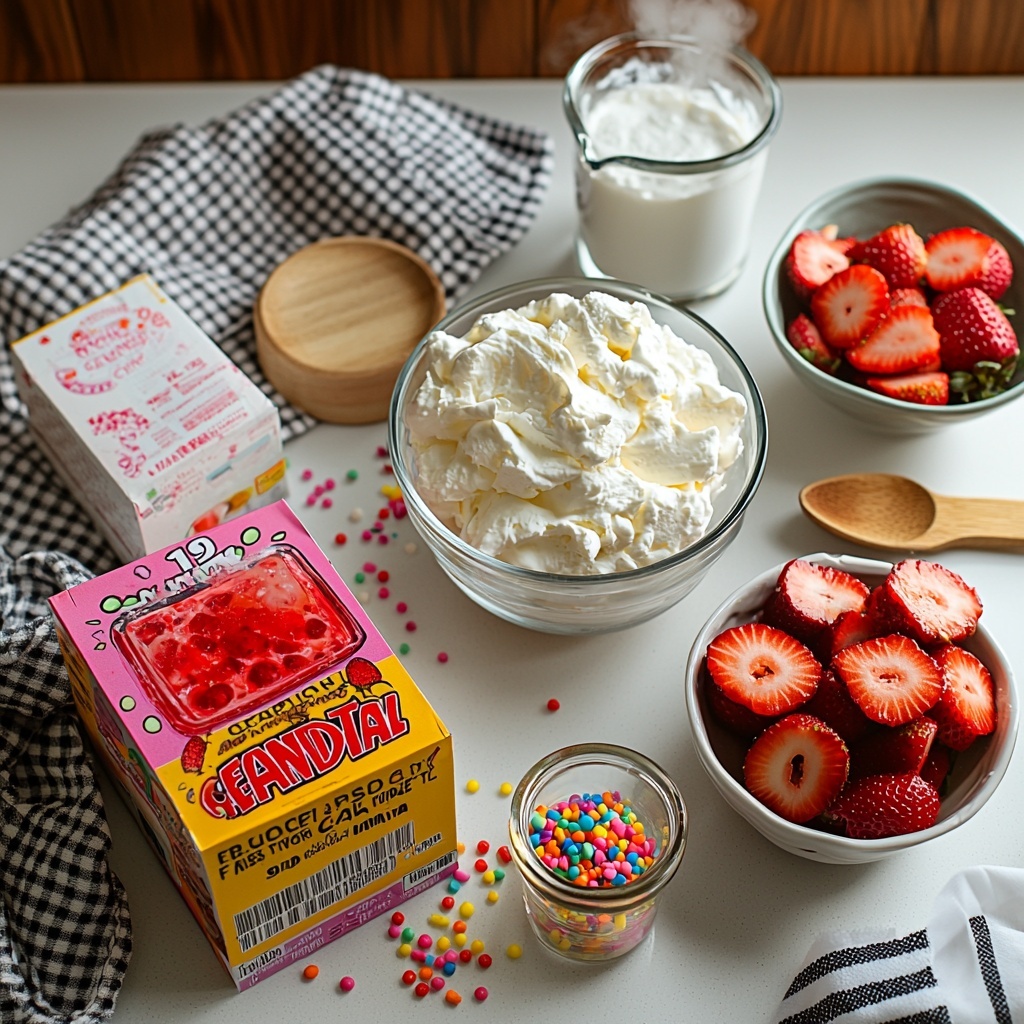
Getting ready to bake this delightful poke cake means gathering a handful of simple, everyday ingredients that each play their part in making this dessert truly special. From the cake mix that builds the soft base to the vibrant gelatin that infuses a pop of color and flavor, every component works together beautifully.
- White or yellow cake mix: Choose your favorite box mix as the foundation; it’s easy and ensures a tender, fluffy cake.
- Flavored gelatin (3 oz): Strawberry is the classic go-to, but cherry or raspberry add wonderful variations of fruity goodness.
- Boiling water (1 cup): Essential for dissolving the gelatin completely and activating its magic.
- Cold water (1/2 cup): Balances the gelatin mixture to a pourable and perfect consistency.
- Whipped topping (8 oz) or fresh whipped cream (~3 cups): Adds a creamy, light finish that complements the fruity gelatin.
- Crushed or sliced fruit (1 cup): Strawberries, raspberries, peaches, or pineapple provide freshness and color balance.
- Sprinkles or colored sugar: The final festive touch that makes the cake pop on any celebration table.
- Optional add-ins: Vanilla extract, citrus zest, pudding mix, or flavored syrup for those looking to personalize their poke cake flavor.
How to Make The Best Poke Cake Recipe for Parties and Birthdays Recipe
Step 1: Preheat and Prepare Your Pan
Start by heating your oven according to the cake mix instructions and greasing a 9×13-inch baking pan. This size is ideal because it makes the poking step easier and yields perfect party-sized slices everyone can enjoy.
Step 2: Mix and Bake Your Cake
Prepare the cake batter exactly as the box suggests. For that extra flavor magic, stir in a teaspoon of vanilla or a pinch of lemon zest if you like. Pour the batter into your pan and bake it until a toothpick inserted in the center comes out clean, typically about 25 to 30 minutes.
Step 3: Let the Cake Cool Slightly
Give your cake 15 to 20 minutes to cool until it’s warm but not hot. This timing is crucial because it helps the cake hold its shape without losing its ability to soak in the gelatin mixture perfectly.
Step 4: Poke Deep Holes All Over
Using the handle of a wooden spoon or a thick straw, poke holes about an inch apart all across the cake. Be sure to go deep but avoid piercing the bottom. Wipe your tool as needed to keep things tidy and smooth.
Step 5: Make the Gelatin Mixture
In a bowl, whisk the gelatin into 1 cup of boiling water until it dissolves fully, then stir in 1/2 cup cold water. The mixture should be warm and pourable—not scalding hot—to soak into the cake just right.
Step 6: Pour the Gelatin Over the Cake
Slowly drizzle the gelatin mixture over the cake, focusing on filling those holes you just poked. Pour evenly so each bite has a burst of fruit flavor and color. It might look like a lot of liquid at once, but that’s exactly what makes the poke cake so wonderful.
Step 7: Chill Until Set
Cover the cake and refrigerate it for at least 2 hours, letting the gelatin fully set and the cake cool completely. This step is essential for that signature texture and visual appeal.
Step 8: Add the Whipped Topping
Spread an even layer of your chosen whipped topping over the chilled cake. You can use thawed store-bought whipped topping for convenience or whip fresh heavy cream with a touch of powdered sugar for a richer experience.
Step 9: Finish with Fruit and Sprinkles
Scatter fresh sliced fruit on top—strawberries are a favorite—and sprinkle colorful decorations for a festive feel that’s perfect for birthdays or any celebration.
Step 10: Chill Again and Serve
Refrigerate the cake for about 30 minutes to set the topping fully. When ready, slice carefully with a clean knife between cuts for neat, photo-ready square pieces that everyone will be excited to dig into.
How to Serve The Best Poke Cake Recipe for Parties and Birthdays Recipe
Garnishes
A simple sprinkle of fruity slices and sprinkles is all you need to take this cake from delicious to dazzling. Fresh berries add juiciness, and colorful sugars bring a playful vibe that’s perfect for festive gatherings.
Side Dishes
Pair this poke cake with a light fruit salad or a scoop of vanilla ice cream to balance the sweetness and keep your dessert table fresh and inviting. A crisp glass of sparkling water or a fruity punch also makes for delightful complements.
Creative Ways to Present
For a birthday bash, line up mini poke cakes in individual clear cups for grab-and-go treats. Or serve slices topped with edible flowers or mint leaves for an elegant twist. Using themed sprinkles matching the party’s colors adds that extra personalized charm.
Make Ahead and Storage
Storing Leftovers
Keep any unused portions covered tightly in the refrigerator. The flavors meld even more after a day, and the cake stays moist and refreshing for up to 3 days, making it perfect for planning ahead.
Freezing
While freezing this particular poke cake isn’t ideal due to the gelatin and whipped topping, you can freeze the baked cake layer alone. Wrap it tightly and freeze for up to 2 months, then add gelatin and toppings fresh after thawing.
Reheating
This cake is best enjoyed chilled and doesn’t require reheating. Bringing it to room temperature for about 10 minutes before serving helps enhance the flavors and softness without losing any of the refreshing texture.
FAQs
Can I use other flavors of gelatin besides strawberry?
Absolutely! While strawberry is the classic choice, cherry, raspberry, or even tropical flavors like pineapple work beautifully and add exciting variations to the poke cake.
Do I have to use a boxed cake mix?
Not at all! You can use your favorite homemade white or yellow cake recipe, just make sure it gives you a tender crumb that soaks up the gelatin well.
Can this poke cake be made dairy-free?
Yes! Swap out the whipped topping for whipped coconut cream or another non-dairy alternative, and double-check your cake mix ingredients to keep everything dairy-friendly.
What’s the best tool for poking holes in the cake?
The handle of a wooden spoon or a thick straw works perfectly because they’re sturdy yet create holes just the right size to let the gelatin seep in without cutting all the way through.
Can I add pudding mix to the cake batter?
Definitely! Adding a pudding mix packet to the batter is a great trick to make the cake even moister and add extra flavor—consider vanilla or lemon pudding for complementary tastes.
Final Thoughts
I can’t recommend the Best Poke Cake Recipe for Parties and Birthdays Recipe enough for your next celebration. It’s a beautiful, delicious dessert that is surprisingly easy to make but looks like it took hours of work. Whether you’re hosting a big party or just want to brighten someone’s special day, this poke cake will absolutely deliver smiles and satisfaction. Give it a try and watch it become one of your go-to recipes for joyful, colorful gatherings!
Print
The Best Poke Cake Recipe for Parties and Birthdays Recipe
- Prep Time: 20 minutes
- Cook Time: 30 minutes
- Total Time: 3 hours 15 minutes
- Yield: 12 servings
- Category: Dessert
- Method: Baking
- Cuisine: American
Description
This colorful and crowd-pleasing poke cake is perfect for parties and birthdays. Featuring a moist white or yellow cake infused with flavored gelatin, it offers a delightful combination of texture and taste. Topped with whipped cream and fresh fruit, this easy-to-make dessert impresses with its vibrant appearance and flavorful layers.
Ingredients
Cake
- 1 box white or yellow cake mix (plus the eggs, oil, and water listed on the box)
Gelatin Filling
- 1 (3 oz) box flavored gelatin (strawberry, cherry, or raspberry)
- 1 cup boiling water
- 1/2 cup cold water
Topping
- 1 (8 oz) tub whipped topping, thawed (or 3 cups fresh whipped cream)
- 1 cup crushed or sliced fruit (strawberries, raspberries, peaches, or pineapple)
- Sprinkles or colored sugar for garnish
Optional Add-ins
- 1 teaspoon vanilla extract
- Citrus zest (lemon or orange)
- Pudding mix
- Flavored syrup
Instructions
- Preheat and prepare the pan: Heat your oven according to the cake mix directions. Grease a 9×13-inch baking pan to ensure the cake doesn’t stick and to make poking and serving easy.
- Mix and bake the cake: Prepare the cake batter according to the package instructions, optionally adding 1 teaspoon vanilla extract or a pinch of citrus zest for extra flavor. Pour the batter into the greased pan and bake for 25–30 minutes, until a toothpick inserted into the center comes out clean.
- Cool slightly: Allow the cake to cool in the pan for 15–20 minutes. It should be warm but not hot to hold its shape while absorbing the gelatin filling.
- Poke the holes: Using the handle of a wooden spoon or a thick straw, poke holes all over the cake about 1 inch apart, going deep but not piercing through the bottom. Wipe the tool if it becomes sticky.
- Make the gelatin: In a bowl, whisk the flavored gelatin powder with 1 cup boiling water until completely dissolved. Stir in 1/2 cup cold water, ensuring the mixture is warm and pourable but not hot.
- Pour the gelatin: Slowly pour the gelatin mixture evenly over the cake, focusing on filling the holes. This may look like a lot of liquid but is necessary for flavor and color infusion.
- Chill and set: Cover the cake and refrigerate for at least 2 hours until the gelatin is fully set and the cake is completely cooled.
- Add the topping: Spread the thawed whipped topping evenly over the cake. For a richer alternative, whip 1 1/4 cups cold heavy cream with 2 tablespoons powdered sugar until soft peaks form and spread evenly.
- Finish with fruit and sprinkles: Decorate the cake with sliced or crushed fruit such as strawberries and scatter sprinkles or colored sugar for a festive, birthday-ready appearance without overloading, so slices remain neat.
- Chill again, then slice: Refrigerate the topped cake for an additional 30 minutes to set the topping. Cut into squares and serve chilled, wiping the knife clean between cuts for tidy edges.
Notes
- The choice of gelatin flavor affects the cake’s color and taste, with strawberry being classic; cherry and raspberry are excellent alternatives.
- Using a 9×13-inch pan is ideal for managing the poking process and servings.
- For softer whipped cream topping, use thawed whipped topping; for richer flavor, whip fresh heavy cream with powdered sugar.
- You can enhance the cake batter by adding vanilla extract or citrus zest before baking.
- Make sure the gelatin mixture is warm to pour but not hot so it doesn’t melt the cake structure.
- Allowing the cake to chill thoroughly before serving ensures clean slicing and perfect texture.
- Optional pudding mix or flavored syrup can be used for additional flavor layers but are not required.


